Budget Challenge
I thought it would be fun to challenge myself to makeover a few spaces on a very tight budget of $100. Honestly, I didn’t think this would really be too difficult….. until I started shopping. Holy Moly people. Stuff aint cheap.
That’s why having a few simple DIY’s (do-it-yourself’s) up your sleeve is going to be vital to making your space feel beautiful without breaking the bank.
But be careful! Sometimes a DIY ends up being more expensive than just buying something pre-made. It’s easy to nickel and dime your way to $25-30 and think you only have $5-7 in something. Ha. Tricky! Keep track of every penny and you’ll discover what is worth the time and what isn’t.
Bathroom Makeover
Bathrooms are a great place to start when you want to freshen up a space. They can be really expensive if you have to replace a lot, but when you’re looking to cosmetically improve an area, you can get a lot of bang for your buck here, as the space isn’t typically large.
I will say, however, bathrooms are the MOST TEDIOUS rooms to paint! There is so much cutting in (painting using a paintbrush around all the windows, corners, tub, baseboards, etc.) and not a lot of paint rolling!
Be prepared to spend some time in all your bathroom’s stinky little crevices if you’re painting! Only it’s worth it as the result is a freshly painted, clean bathroom. It probably should be done more often as the paint can help absorb other unwelcome odors.
Farmhouse bathroom desire
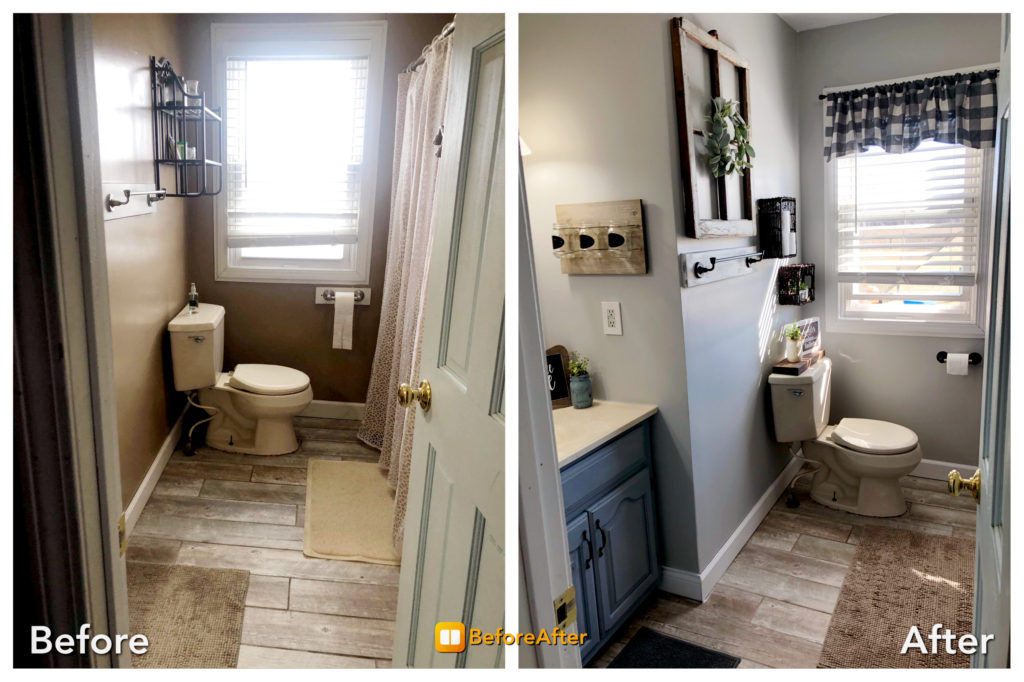
The owner of this bathroom has a fresh farmhouse style throughout her home and was hoping I could figure out something in her bathroom! They had just replaced the floor and then hadn’t finished the rest yet as it felt overwhelming.
It was a brownish color on the walls which made the room feel dark and uninviting.
The baseboards and trim hadn’t had the nail holes filled from when they were applied and just needed a fresh coat of white paint to freshen and brighten. The ceiling also needed a fresh coat of white paint.

The vanity was looking pretty beat up on the wood but is well-built. The cabinet doors and drawers still worked and the top was clean so that was a big bonus!
The medicine cabinet wasn’t really necessary as there is a large closet with ample storage in this bathroom. This was an area I knew that we could utilize to bring in a beautiful mirror with some farmhouse style.

The makeover steps
Disclosure: Our shopping links are sponsored, or affiliate, links, which means that we could earn a small commission that helps fund our blog (at no additional cost to you!), so thank you for your support and happy shopping!
Take everything out
Remove everything from the space you’re remodeling. Take the curtain down, stuff off the walls, and give it all a good wipe down!
Using a screwdriver, remove all the outlet and light switch covers. This makes it so much easier to paint around. (Note: If your covers look really gross, they are very inexpensive to replace at Lowe’s or Menards- like under $1)
Take the nails and screws out of the wall and fill the holes with a spackle. I like this one.
It’s the extra care in these steps that make a room look professionally done. Skipping this first step will save you some time, but the quality of the finish will just lack that new feel, as you’ll see old holes and marks through the new paint.
The previous owners had decided to permanently glue the two pieces of wood to the wall that the towel rack and toilet paper holder are attached to. I yanked the toilet paper one off the wall, leaving a mess behind that I had to majorly repair, so I decided to leave the towel rack on the wall and just paint it to look like it was part of the design.

Save what you can re-use
When doing a budgeted makeover, it’s important to re-use whatever we can. It was substantially cheaper to buy one can of spray paint than all new hardware.
So, I removed all the hardware and decided to spray paint it all black. I used Rust-Oleum premium ultra matte spray paint. It did a great job covering and made all the hardware look great as well as match. I believe I picked it up at Walmart.
I made sure to check every angle as it dried to be sure each piece was well covered. I applied at least 2 coats, because I kept noticing little places I missed. I did not paint the little piece that holds the toilet paper because I felt like it was going to be handled a lot and didn’t want to be concerned of the paint chipping from this overuse. I did paint the pieces it is held by.


Tape off, Cut in, and paint
It you want to tape off your trim and baseboards because you’re a bit of a messy painter, go for it! It will save you lots of time later instead of trying to touch up with paint all the little mess ups!
I usually just go for it as I have done quite a bit of painting and am pretty comfortable with painting straight lines.
Starting with the things I’m least excited about helps keep me going. lol. So, I start with cutting in and prep work then I roll on the color. There’s not much better in my opinion than seeing a room transform when you start rolling that beautiful new color on the walls.
I chose “Passive” by Sherwin Williams for the wall color in this bathroom. It’s a grey-blue color that’s got a serene, I guess passive, feel. Well named, Mr. Williams.
Tip: Keep your roller loaded with paint.
You don’t want to roll until it’s dry. One line at a time is about all you should get out of a loaded paint roller. You don’t want it dripping or anything, just be sure to refill before it runs dry. This will cut back on the amount of touching up that will need done.

The vanity was painted “Tennessee Slate Blue” by Glidden. After it was painted and dry, I took a bit of sand paper and scuffed up the edges where it would naturally have been worn to create a farmhouse finish.
Frugal tip:
To save money on paint, I chose my colors and then had Walmart colormatch the colors with their special machine. So I really used Color Place paint, colored to the colors I prefered, which is substantially cheaper. They may not be exact or as great of a finish, but for the savings, I find it well worth it.

Putting it back Together
All of the hardware was reattached, a new mirror hung, and some new décor put up. The sweet little buffalo check valance really brought in some warmth and texture by adding a fabric. I think this bathroom on a budget really turned out nice. It’s so bright and inviting now!

I found a premade sign at Meijer for $4 that I applied “It is well with my soul” in vinyl to.
A mason jar spray painted brown and then blue, and finally sanded to reveal the brown underneath was filled with a little tuft of green and placed next to the artwork for a simple décor element on the sink.
The mirror was found at Kirklands for $17. I just love the detail!


A little bit of vanity paint was applied lightly with a dry brush on the existing glued on wood and then sanded slightly. The freshly spray-painted towel rack was re-installed and looks so much better!

A grey, textured shower curtain was purchased at Walmart for $10 along with some simple metal rings for $2. I also got a new plastic liner for the inside curtain for $3.
I really wanted to put some stained wood floating shelves above the toilet but ran out of budget, so I opted for these baskets found at Hobby Lobby for around $7.

I put together the little buckets of green for an additional $4 because I used green I had laying around and made the sign on the back of the toilet with scrap wood from the garage. The sign says “Sprinkles are for cupcakes not toilets” which is great for this home with only boys.

Simple changes for big style
Keeping the colors soft and clean help a room feel bright and inviting. When working with a bathroom, I think it’s best to go with a fresh feeling design. Whites and greys/blues give a cool, calm, clean look. We don’t need it feeling any darker, dirtier, or dingy where we do our most private business.
Think purpose when designing a small space like a bathroom.
If you’re going to hang an open shelf, be sure that whatever you’re planning to store there, you don’t mind being on display. If you have a lot of clutter and not a lot of storage options, consider cabinets with doors rather than open shelves or choose baskets instead of glass jars for hiding your necessary bathroom items.
Remember that we live in our spaces. Not every room can look like a magazine every day. Be sure to sit down and consider what you need in a space before decorating. Find clever ways to incorporate purpose into your design.
The jars on the wall will soon hold messy boy toothbrushes and there will be toothpaste all over that sink and little boxers and socks all over the floor even though there’s a laundry basket 2 feet away in the closet.
Because that’s life, and life’s messy.
But for now, let’s look back at the sweet little before and after pictures.


Cost break down
My receipts are a bit all over the place, not a surprise, but I can give a pretty great idea of what each thing cost me in Indiana.
Paint (1 gallon passive, I gallon Tennessee slate, black spray) $40 – biggest chunk! (Now technically, I did not use all of this paint and plan to use it on another project so I could choose not to count the whole $40 as I’ll split it with another future project- but I still would’ve had to buy it so it all depends how you want to look at it.)
Valance $8 at Target
Mirror $17 at Kirklands
Shower Curtain, hooks, and liner $15 at Walmart
Rug $3 at IKEA
Baskets $7 at Hobby Lobby
Décor: Sign $4, Wreath $5, buckets $4, Sprinkle sign, mason jars, window, vinyl, greenery ***free because I had extra around. The window didn’t cost me anything in the first place, the sign was a cut-off and greenery was taken off other décor. She already had the toothbrush jars.
I’d say my grand total was very very close to being right at $100. Pretty proud of that.
What do you think? Are there some ideas here you plan to try?

Another amazing transformation, Rachelle! I love the style and softness that you brought to this space, and as always, the little details that make it feel so personal and special!
Thank you Christy!