This post is full of nursery decor ideas for a mountain-themed boy’s room.
I’ll show you how I made matching DIY nursery mobile, pillows, room sign, and painted mountain mural and coordinated those with store-bought nursery furniture and other little details.
Our new home
We bought a major fixer upper! The location was exactly where we wanted our family to be. Ever since we first got married, we’ve been circling around the area, hoping to land in this spot.
Although I plan to share more and more of our home updates, let’s start with the nursery!
We bought this home and then found out we were expecting our 4th child. We started wondering if downsizing was a ridiculous move on our part. We were growing in our family but choosing a smaller home.
But…..Location, Location, Location.
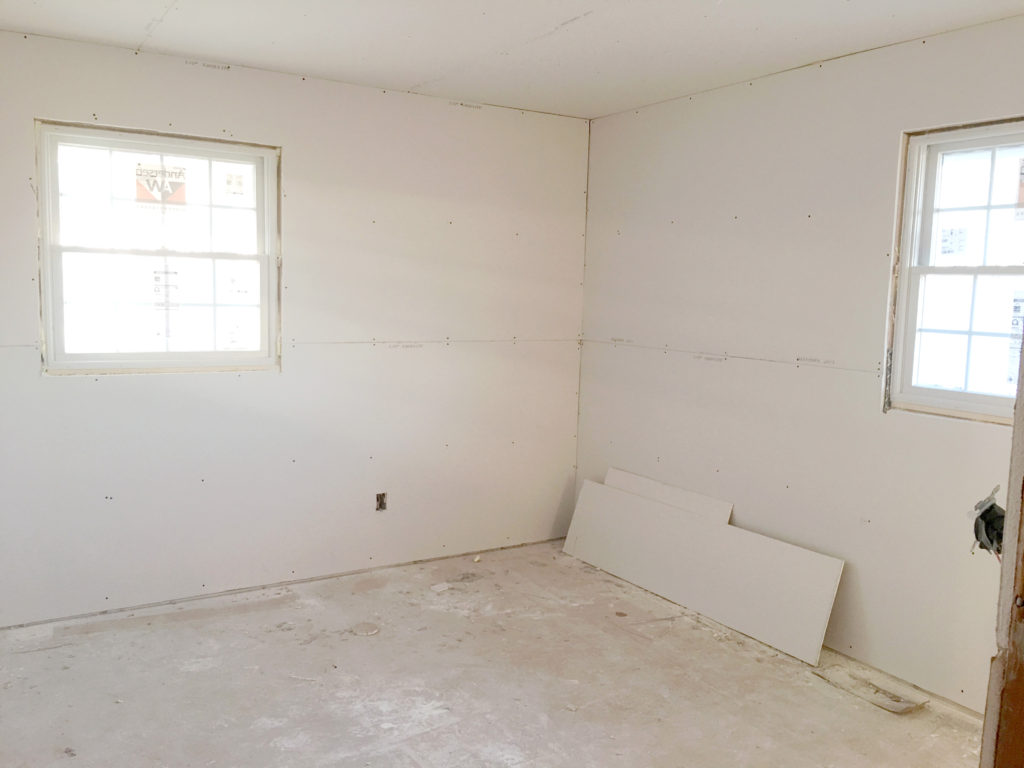
Nursery Room Remodel: The Beginning
We decided to keep the baby near our master bedroom, so this beautiful, paneled room was chosen as the future nursery.
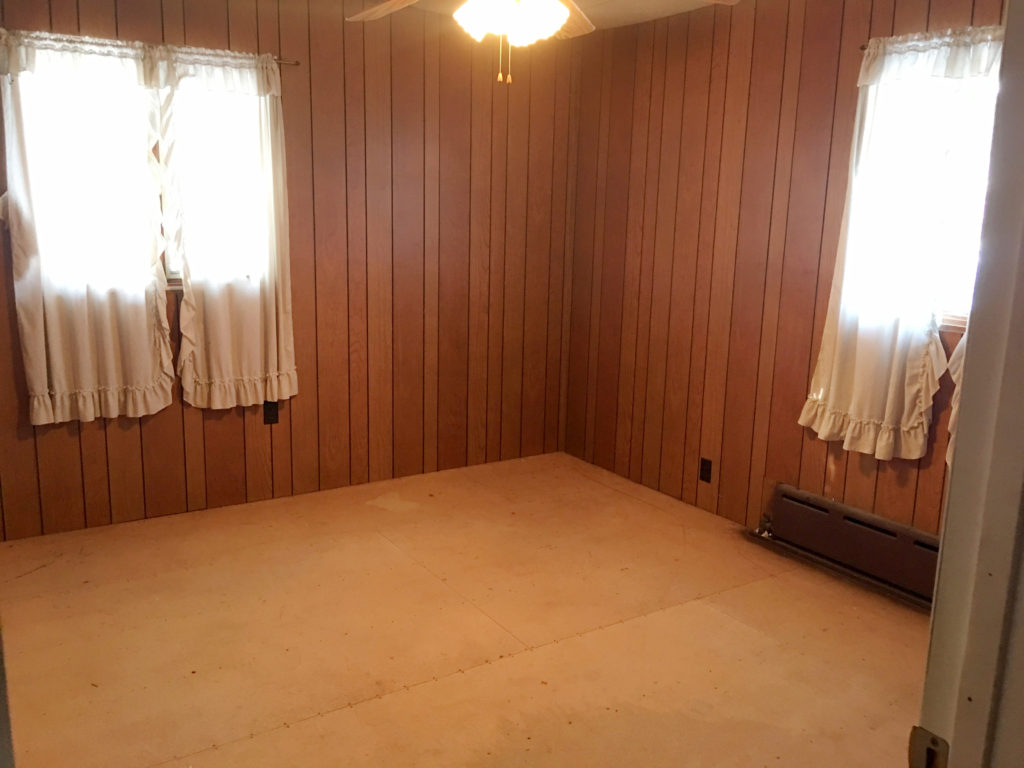
We could’ve left it be, but decided it may be more baby-safe to update it. I did want to do a mountain theme, but the panels were just a little too woodsy for my taste.
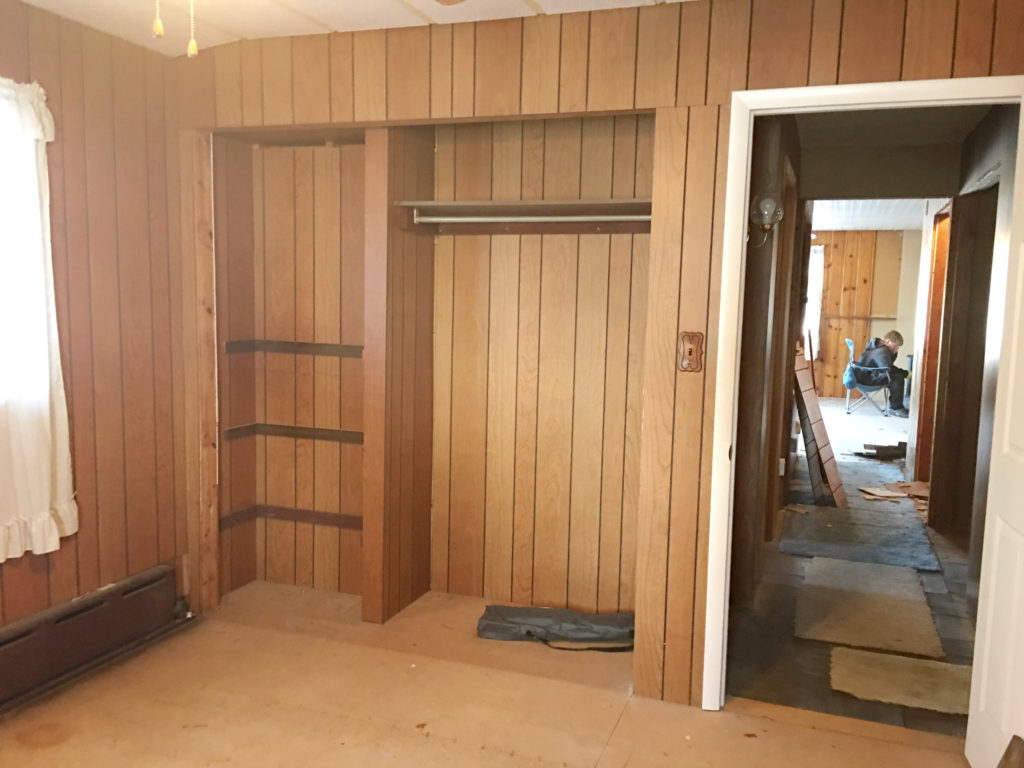
The other side of the room boasted an open closet with some missing panels and an uneven wall. The little nook on the left was not as deep as the right because the bathroom on the other side of the wall showcased a slightly recessed toilet.
bare bones
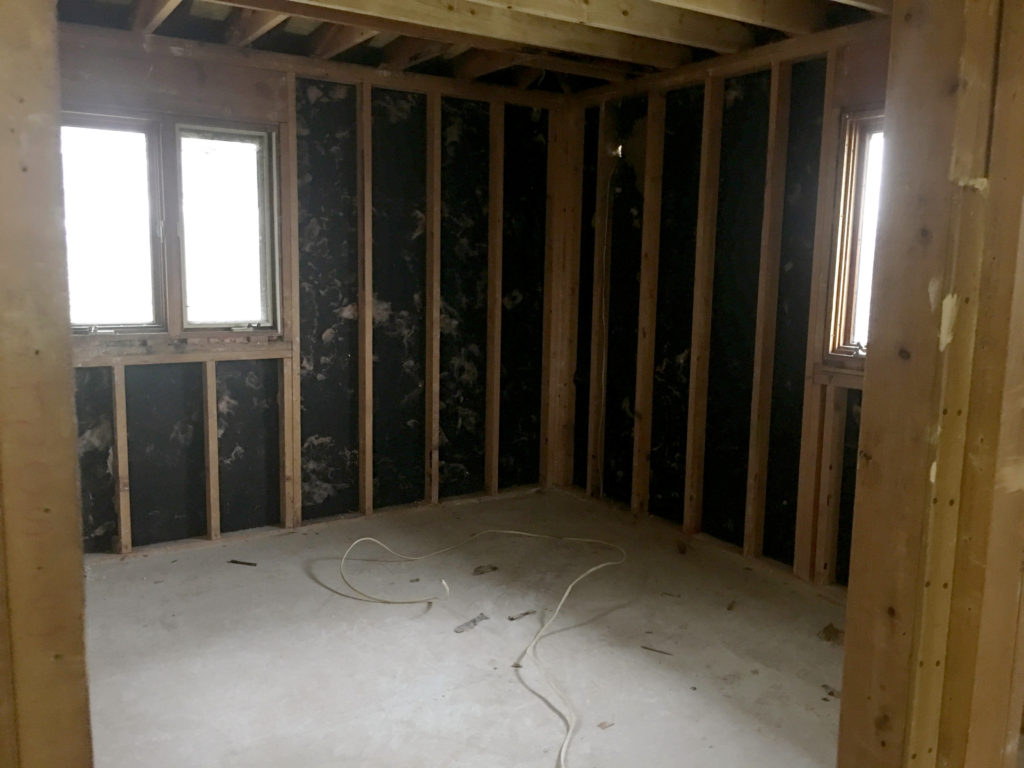
To begin this room makeover, we decided to take it down to the studs. This allowed us to put new insulation in and rewire everything so we got to fix all the uneven outlets, placed at unique heights.
We also put in central air and heat so that took care of needing floor boards.
Starting this project in the middle of winter made for some very very chilly work days. No insulation or heat was no picnic.
Adding INsulation & Drywall
What a difference new insulation and drywall make! So fresh and so clean!
Well, not really clean. There’s more dust that comes with drywalling than with a dust storm! I think after 2 years, I’m still wiping up a bit of drywall dust on the windows!
Speaking of windows, those are new too! Our bills are substantially lower because of all this groundwork we did in weather-proofing the house.
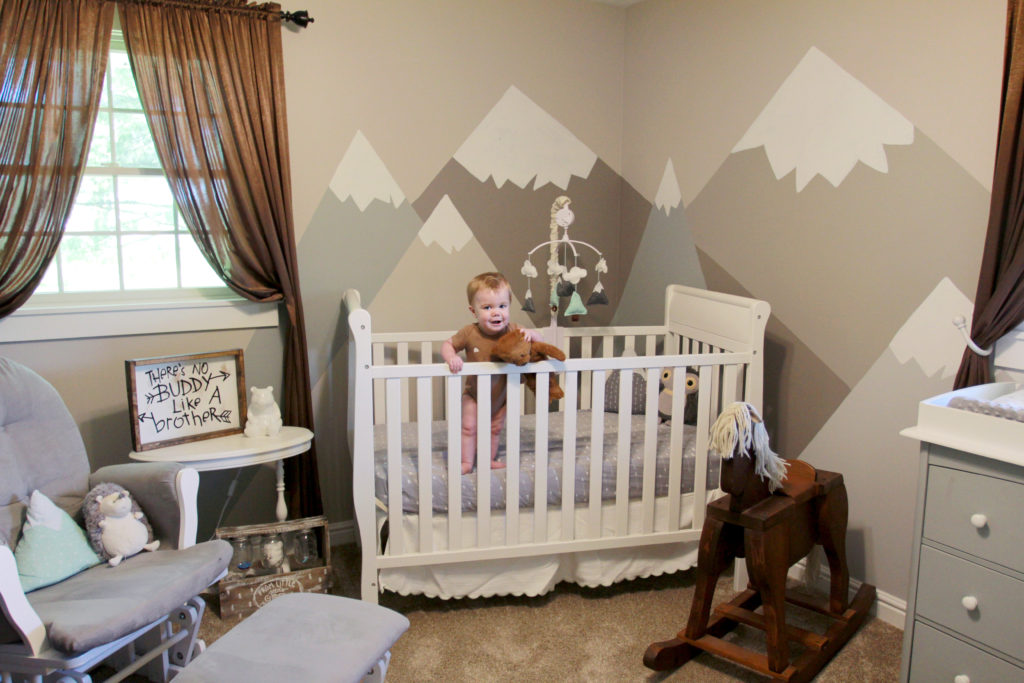
An Easy Way to DIY a Mountain Mural
Disclosure: Our shopping links are sponsored, or affiliate, links, which means that we could earn a small commission that helps fund our blog (at no additional cost to you!), so thank you for your support and happy shopping!
I guess I don’t have a picture of just the paint on the walls, but here’s where I started. I painted the base color on the walls which was Sherwin Williams “Alpaca”. It’s a very soft greige (grey and beige) color.
I used painter’s tape to outline where I may want the mountains that would soon grace these walls.
This was important so that I could visualize the size they would be.
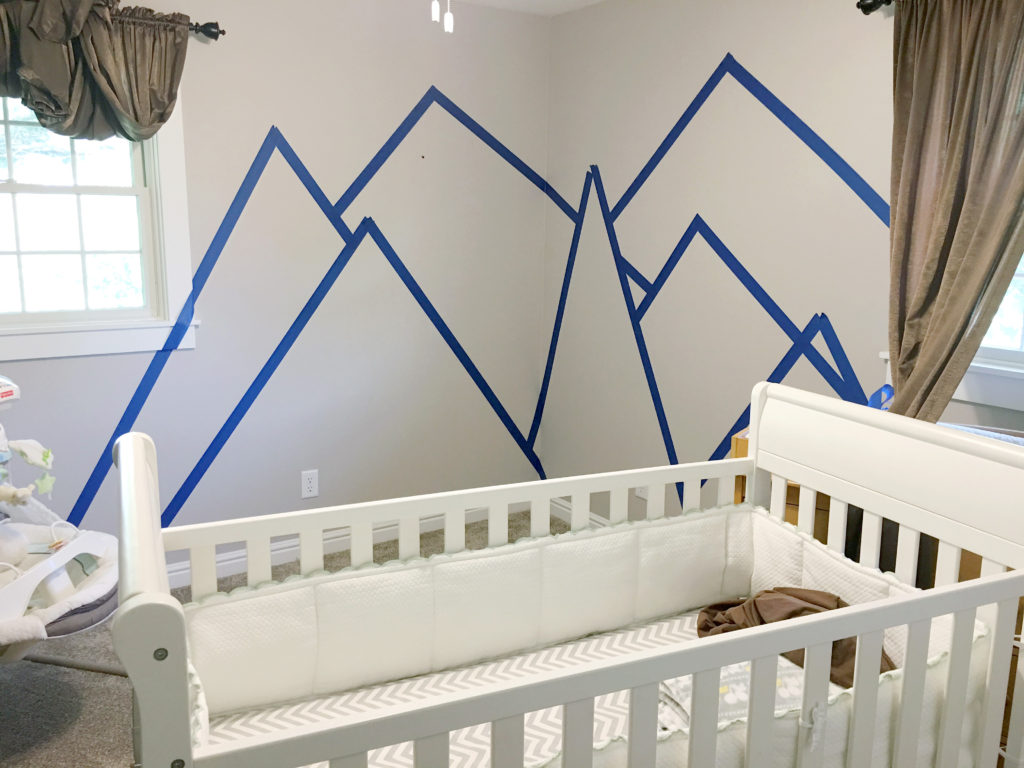
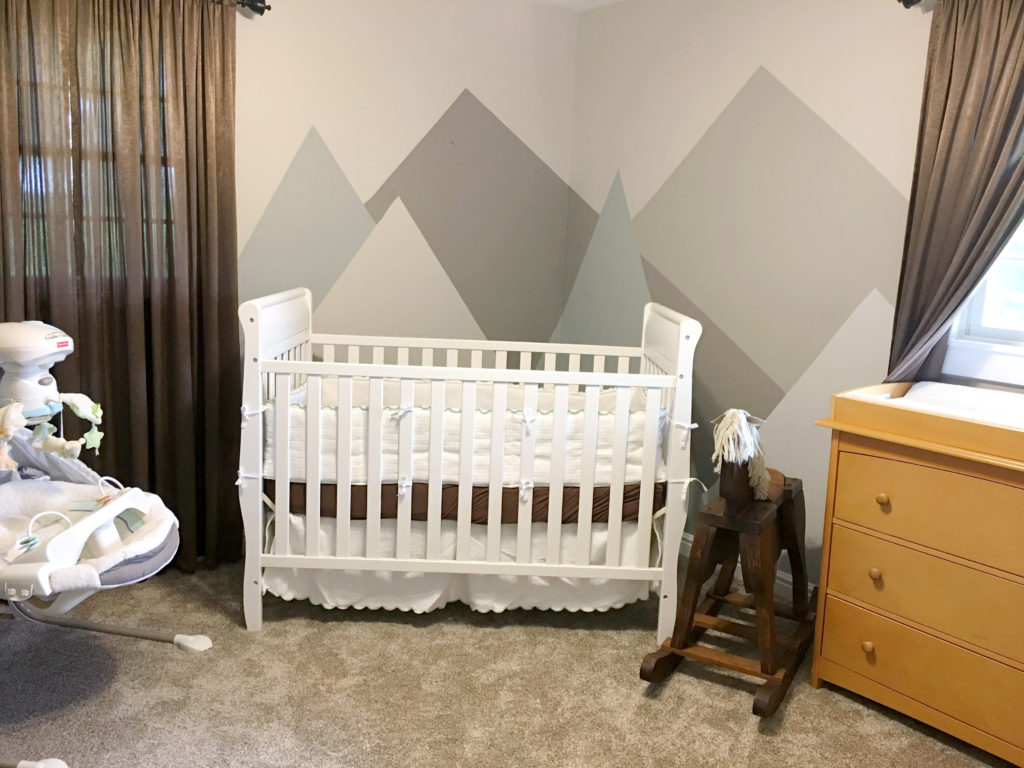
I used all the colors that were in my house, so this is basically a color palette of my home.
I painted this with the tape on and then after I removed the tape, I carefully painted the tape lines of the background mountains, otherwise you would have wall color remaining a tape’s width between each mountain.
They were looking a little geometrical to me so I decided to paint some snowy tips.
The changing table got a makeover as well!
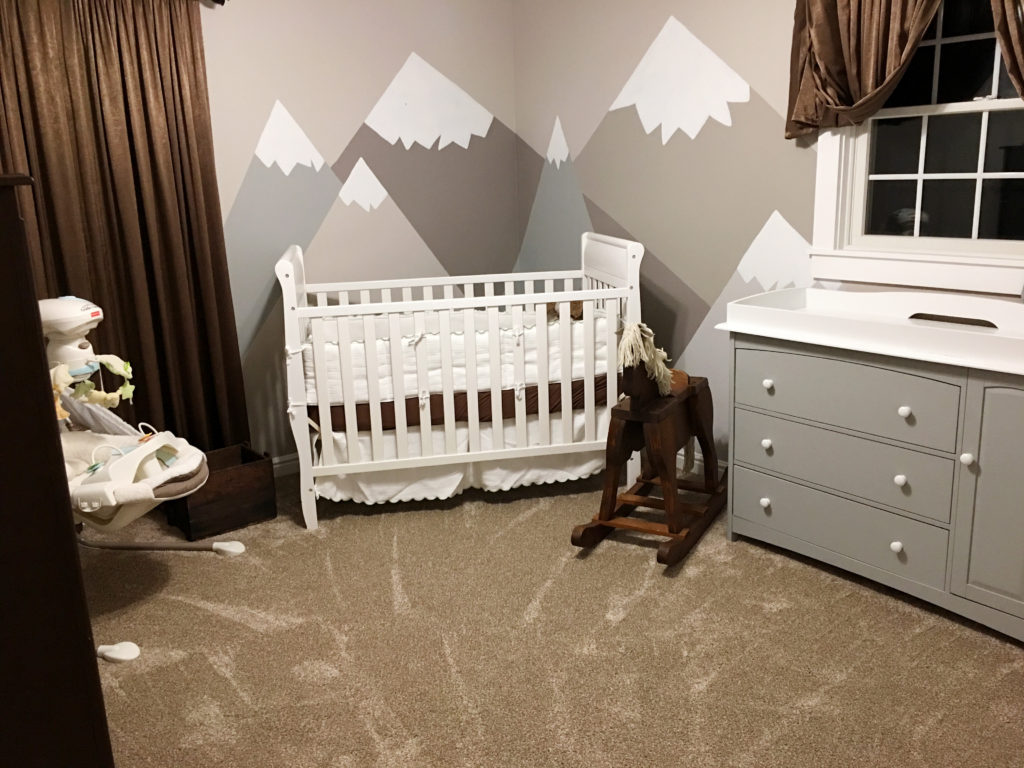
I love the look of this room! All that was left was to finish out the room and make all the décor.
Mixing Store-bought Decor with DIY Decor
I knew that I wanted to make my own mobile to match my nursery theme and purchase a cute changing pad to complete the freshly made over changing table.
I bought a wipeable changing pad cover that I found at Target! (Shown under the mountains, clouds, and trees of the DIY nursery mobile.)

I love that it has arrows on it, but even more that it is made of wipeable material. The outside edges are a very soft fabric, but the inside fabric is a plasticky vinyl feel.
I love it. It lasts so much longer than the ones that are all fabric because I can simply wipe up the little messes that sometimes occur when one changes a diaper, without having to take the whole thing off!
I also purchased a glider rocker, which I never had with my other boys, but highly recommend!
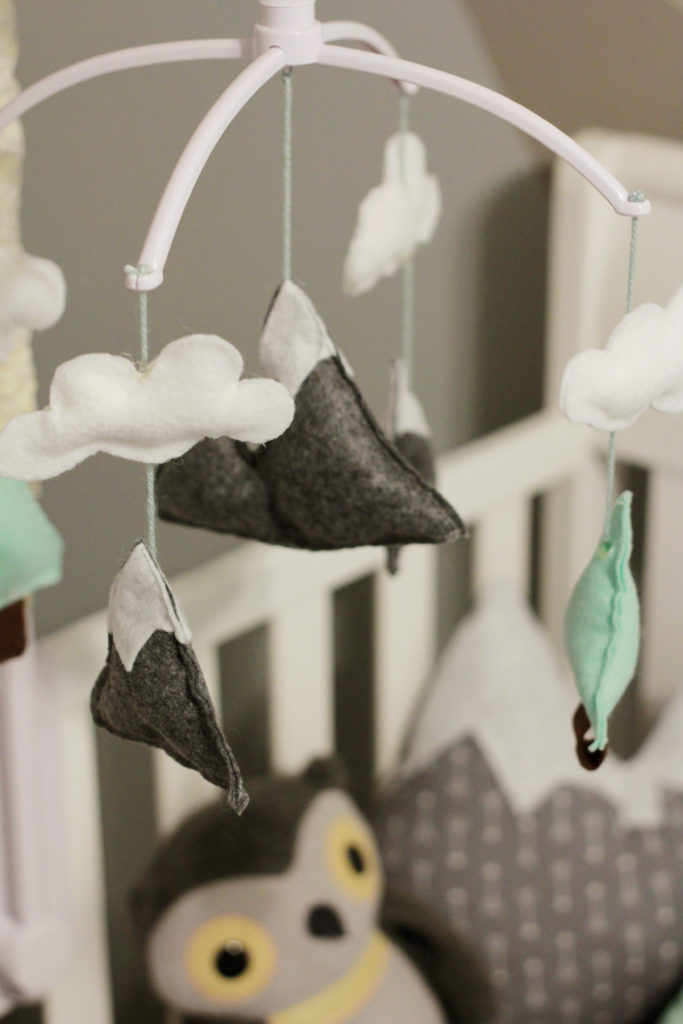
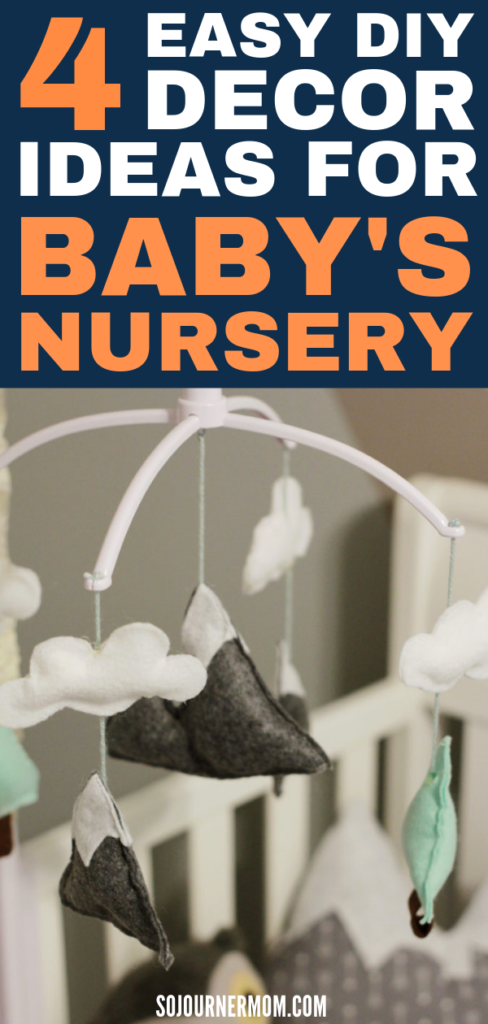
DIY Nursery mobile with a Mountain Theme
These mountains and trees were made with felt that I purchased at a craft store. My grandma helped me sew them.
If you don’t sew, these could easily be stuffed and hot glued together. That’s how I ended up doing the clouds in the end.
I love the look of them sewn, but the practicality of glueing felt is a great option as well!
I found a mobile at a garage sale that I disassembled, but you can buy them ready to DIY from Amazon!

I simply attached my little felt creations with yarn.
I cut a little hole in the mountains and trees and then threaded the yarn through and secured it with hot glue to keep my inner stuffing from falling out and my mountains in place on the yarn.
DIY Mountain Pillows for the Nursery
Grandma and I also made some pillows from fabric that I picked up at Hobby Lobby.
I just drew out a mountain design on the backside of the fabric, cut it out and then sewed them nearly shut.
With a little space left, we flipped the fabric right side out, stuffed them with fluff, and then finished them off with a bit of hand-sewing.
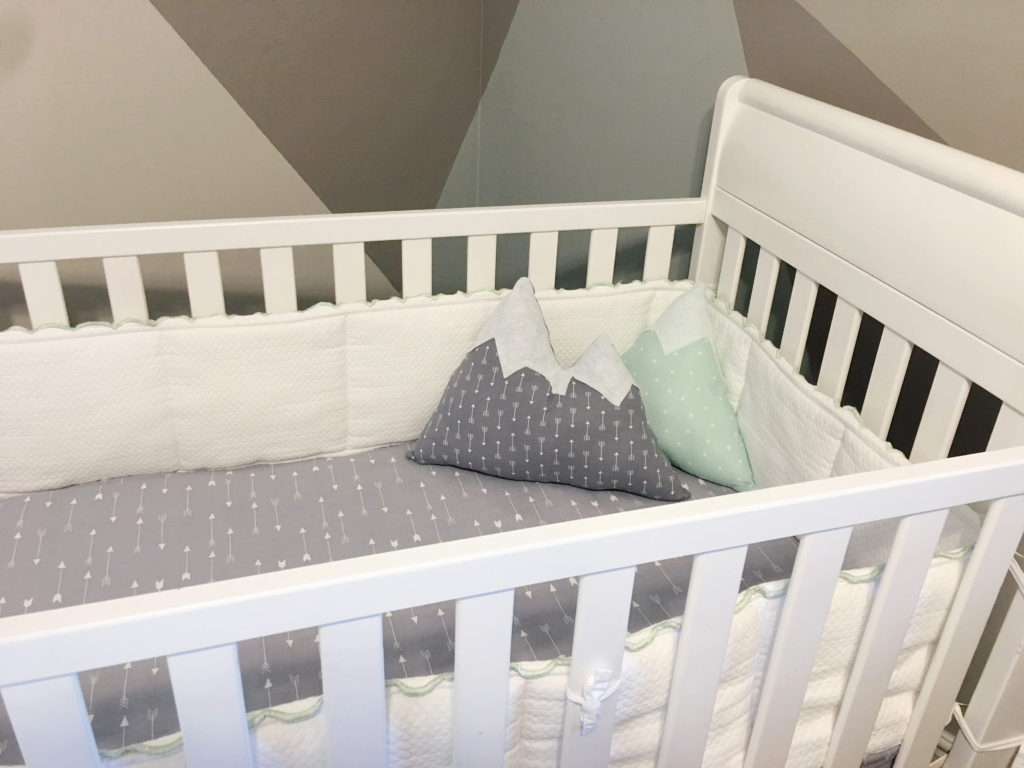
The fitted crib sheet was found at Target. They have some really neat pre-made nursery décor if you don’t want to make your own!
The Real Meaning behind the Arrow Decor
I’m totally enjoying decorating with arrows! Especially because of the Bible verses that were brought to mind when I found out we were having a boy.
Read the verses and see my reaction to finding out we were welcoming our fourth boy in this Bible journaling post.
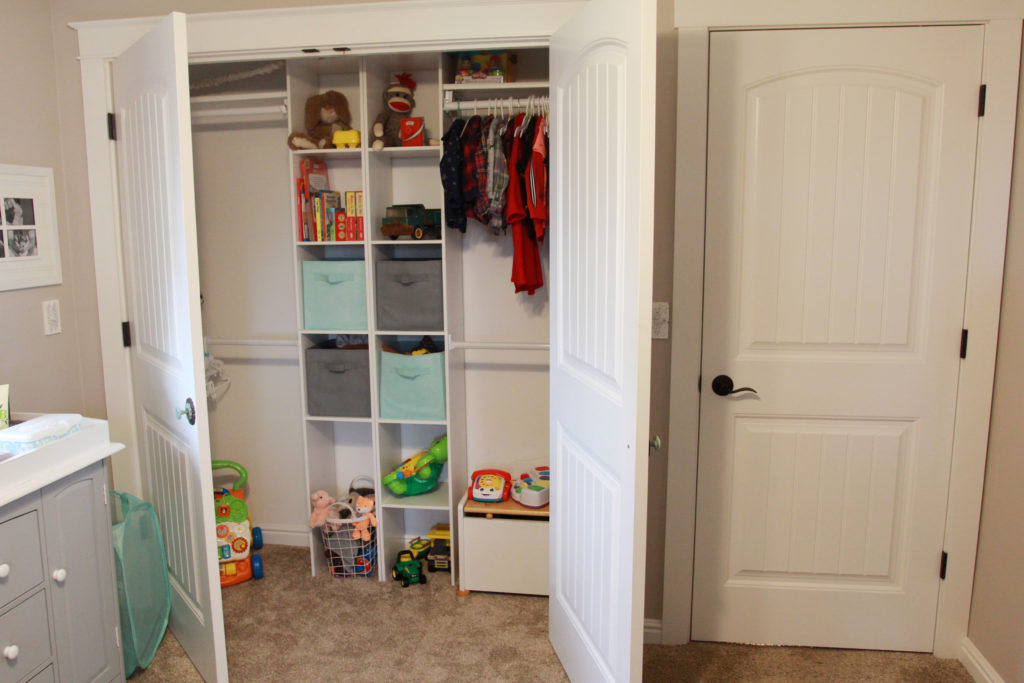
HOw I Organized My Boy’s Nursery & Made It Pretty
It feels good to be organized!
The closet got a new organizer. I just combined two of these cheap kits. As you can see, there is plenty of storage!
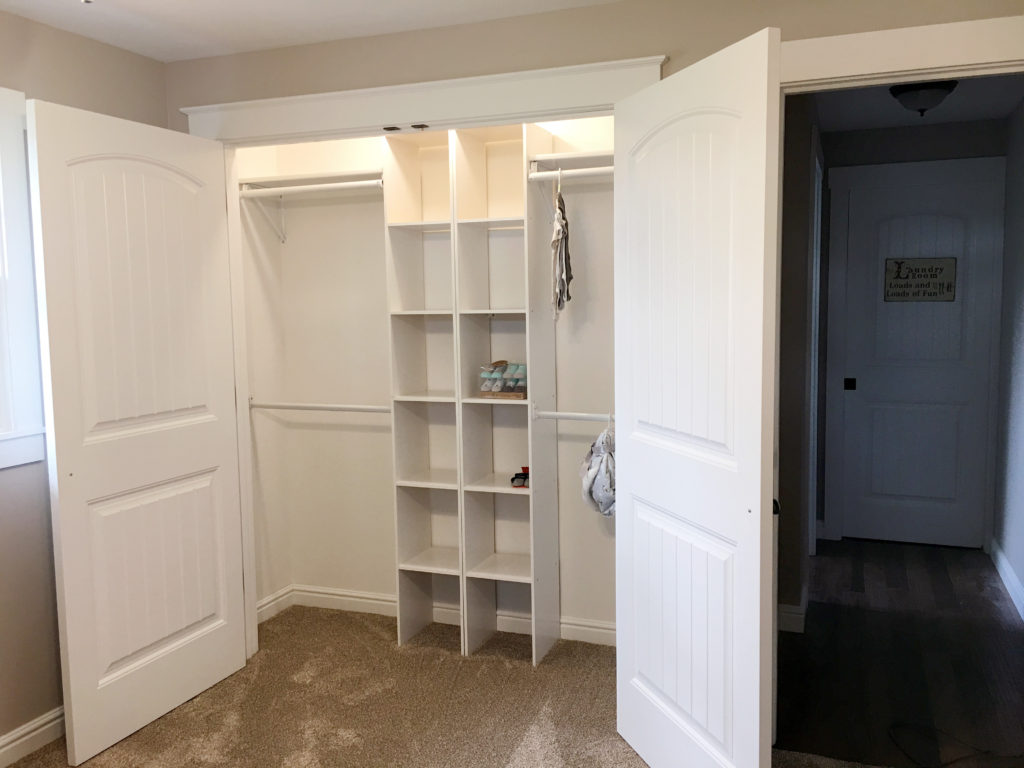
I purchased some mint and grey storage bins to keep extra sheets, toys, shoes, and other baby things in. (Shop similar bins here.)
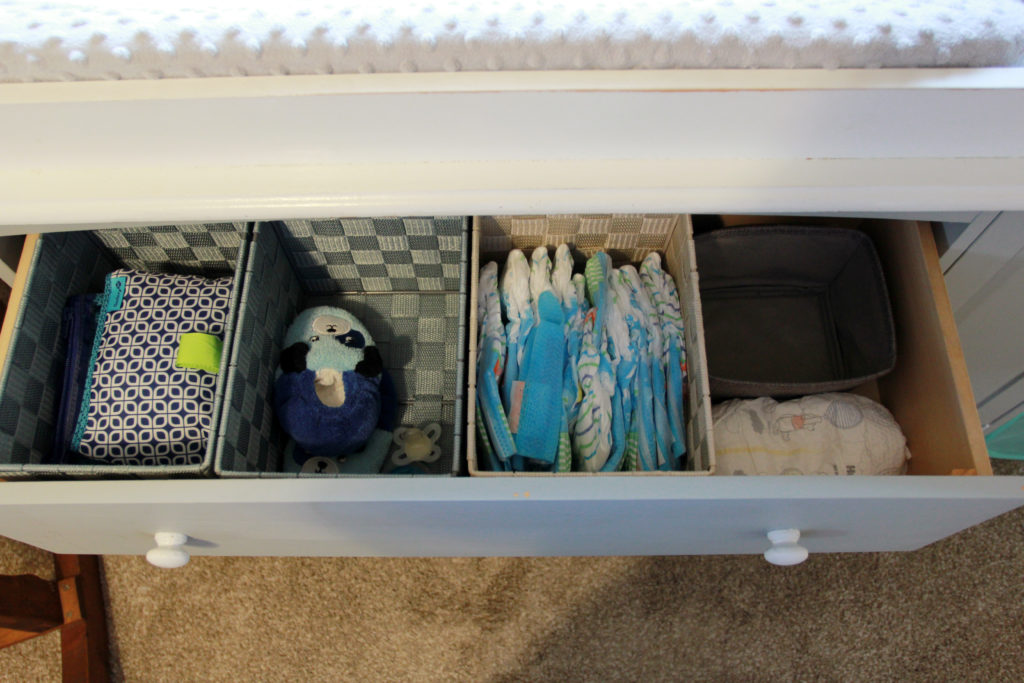
Baskets are great for organizing! They hide mess and hold a lot. I use them in drawers and in all of our closets.
The top drawer of the changing table has more baskets that help to hold miscellaneous baby items.
Different stages, they’ve held different things. Socks, burp cloths, swim diapers, extra pacifiers, first aid kit, and nail clippers.
Right now the drawer is a bit empty as little man has moved out of burp cloths and bandana bibs, and it looks like I need to do laundry because he’s out of socks!
Adding A Few little Touches
It’s the final touches that make a room feel special and unique after a bedroom remodel.
That’s the place that most people stop because it can feel overwhelming to decorate. They’ll pick a paint and put it on the walls and get some bedding, but it’s sometimes the littlest things that scream style!
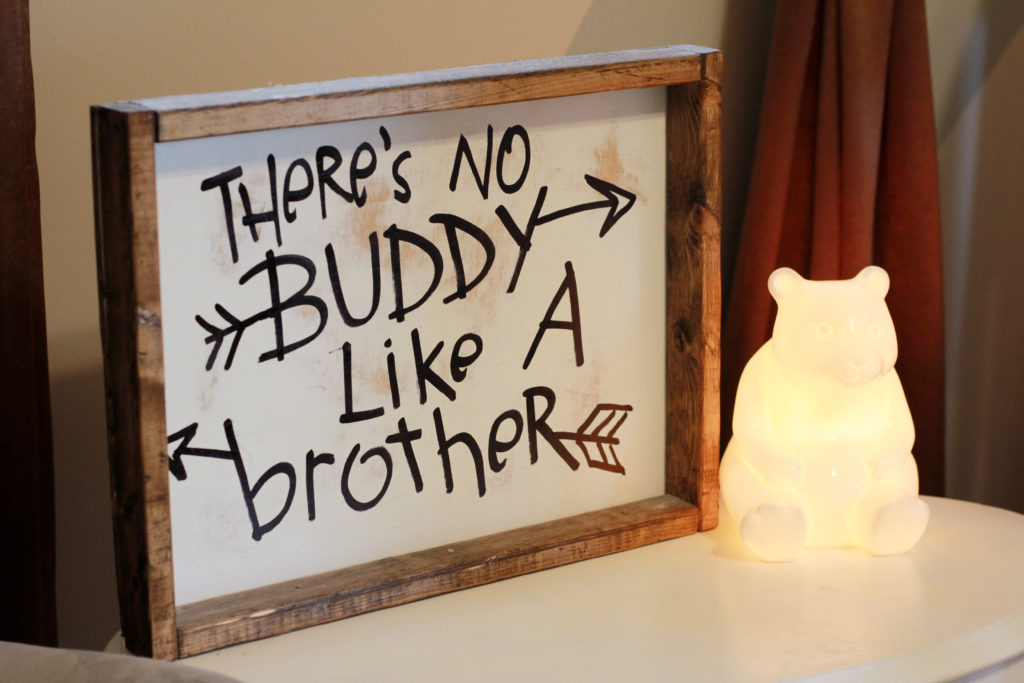
The bear lamp was found at Target and adds a very soft light. I leave it on sometimes at night or during naptime. It’s very much like a night light but with a lot more style.
Plus, you can put it higher as it has a cord and doesn’t need to be plugged directly into an outlet like a typical night light, making it a safer option. Here’s a similar bear night light lamp.
An Easy Rustic DIY Sign FOR THE NURSERY
The rustic nursery decor sign was made with some thin plywood painted white and a 1×2 that was stained and cut to fit the plywood for a frame.
I “painted” the saying: There’s no buddy like a brother. I just love the subtle play on words in that quote.
I put painted in quotes because I didn’t actually paint the words…
I used a paint pen! This is the best thing to happen to paint!

No longer do you have to use a paint brush and painstakingly get your strokes just right.
A paint pen writes just like a marker but it’s smooth and flows like paint. The finish looks awesome and it takes a fraction of the time to complete!
Talk about life-changing!
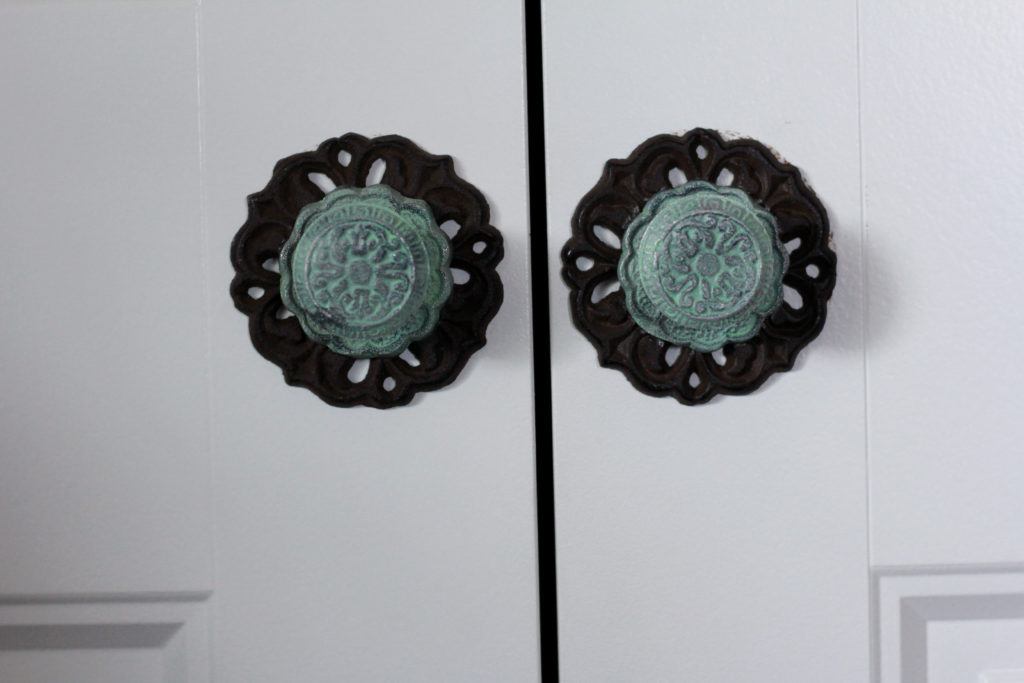
Layered Knobs for the Nursery Closet
I added other little details like new closet doorknobs. This is another place you can add special touches to really add extra style for a nursery room makeover.
The closet door has knobs instead of handles. The doors don’t have a latch, so all I needed was a handle for pulling them open.
I layered 2 different knobs that I found at Hobby Lobby to get this effect. Why stick to ordinary when you can get creative?
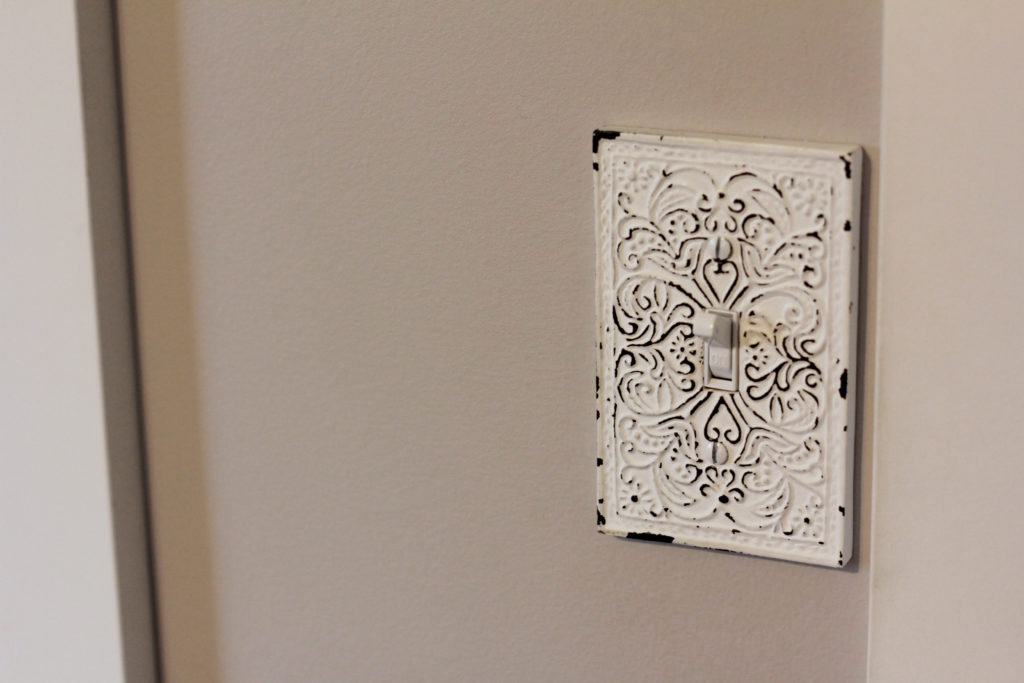
Across from the knobs at the store, I spotted these gorgeous switch covers. I knew they would make the room even more unique so I snatched up two of them.
One for the main light switch and one for the closet light switch.
Finally, this nursery wall art hangs above a dresser on the left side of the room.
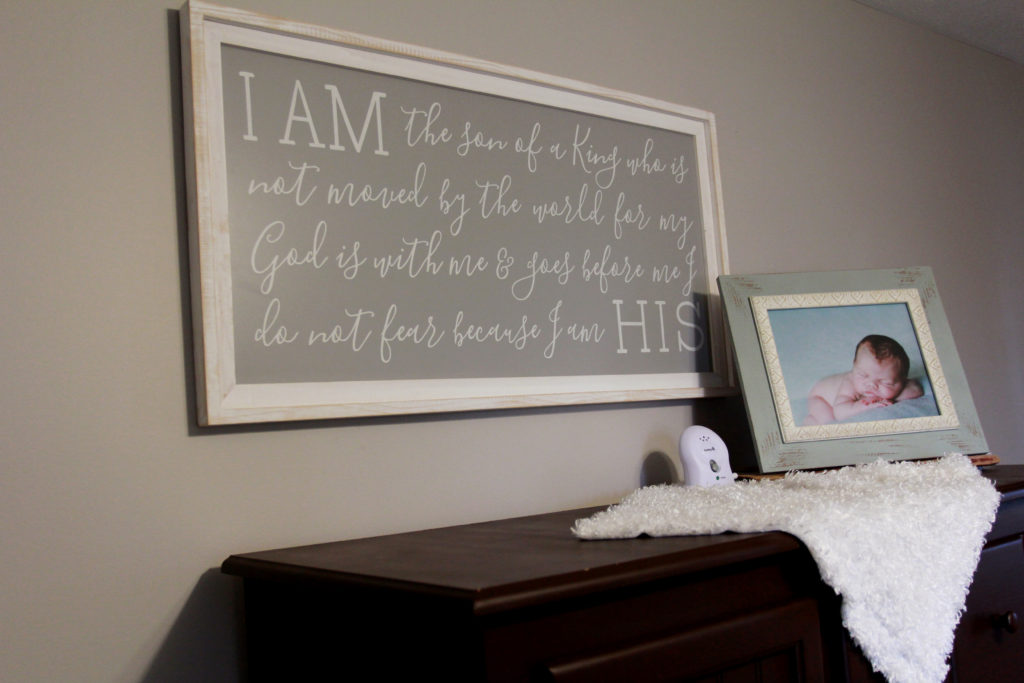
I love the saying,
I am the son of a King who is not moved by the world, for my God is with me and goes before me. I do not fear because I am His.
My son’s newborn photo also graces the top of the dresser. There are typically some cute stuffed bears all around the monitor, but little man just had to have them all today to play with, so they are scattered around the entire house.
This nursery underwent a huge makeover, and I just love how it turned out!
Little man likes it too!
Other posts you might like
If you liked this post on nursery decor ideas for a room remodel, check out these other posts on Sojourner Mom.
- How To Decorate A Shared Bedroom
- Bible Journaling for Beginners
- 5 Crazy Good Lactation Recipes to Double Your Milk Supply

what were the colors you chose for the mountains? I believe there are 3 different ones?
Thank you
Yes. There are actually 4 different colors. Leftover from paint I had used throughout my home. All are Sherwin Williams. Alpaca, Pussywillow, Highland grey, and Cobblestone arch. The highland grey and pussywillow look very similar. There is a bit of a purple tint to the highland grey and a bit of a green tint to the pussywillow. The rest of the room is painted in Alpaca. (Also, sorry for the delay in responding. I only just saw your comment)