Looking for a simple photoshoot idea for Easter? Well, look no further because this one is a piece of cake. Or keep looking. Really, it’s up to you.
Disclosure: Our shopping links are sponsored, or affiliate, links, which means that we could earn a small commission that helps fund our blog (at no additional cost to you!), so thank you for your support and happy shopping!
The set up
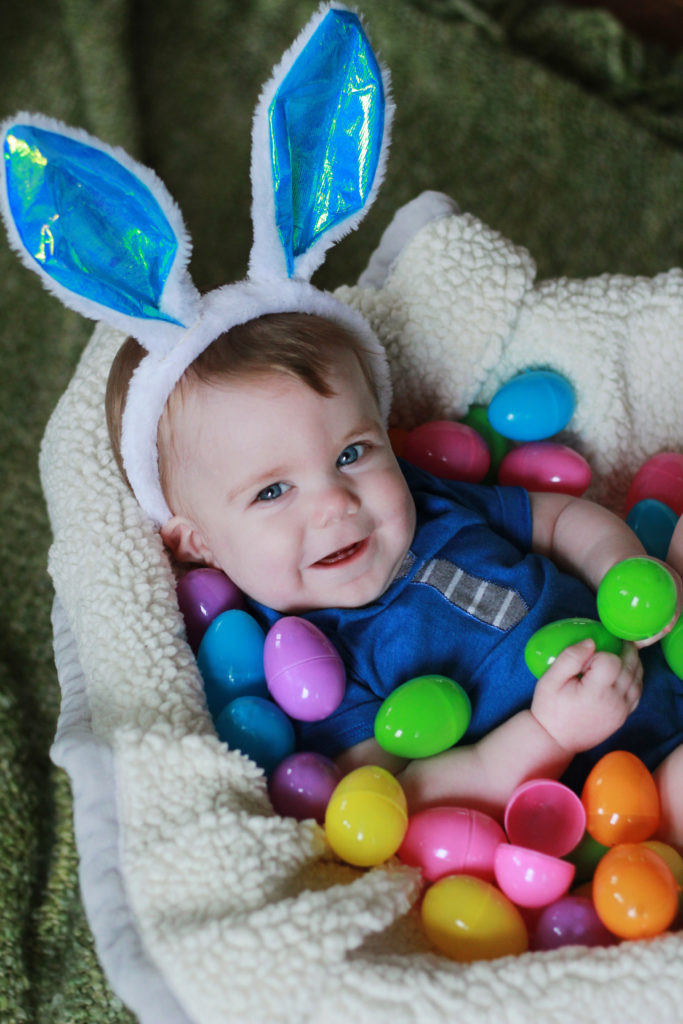
1. Find a Container
First you’ll need something to put your baby or toddler in. I used a Rock-n-Play like this one, which I absolutely loved in place of a bassinet. My little guy enjoyed being in it. He loved how it cradled him and kept him a bit elevated instead of laying flat.
I also used it for quite a few photoshoots as it kept him off the floor, saving my back, and I could tuck blankets around him. Perfect for 3-4 month shoots before they’re sitting up on their own.
You can use anything really for this shoot: A crate, large basket, the arm of a couch, or even a simple box.
2. Layer Blankets
Cover with a soft blanket and place baby inside. If using something deeper, like a box, layer a few blankets or towels before draping your final backdrop blanket so that baby’s head is above box level.
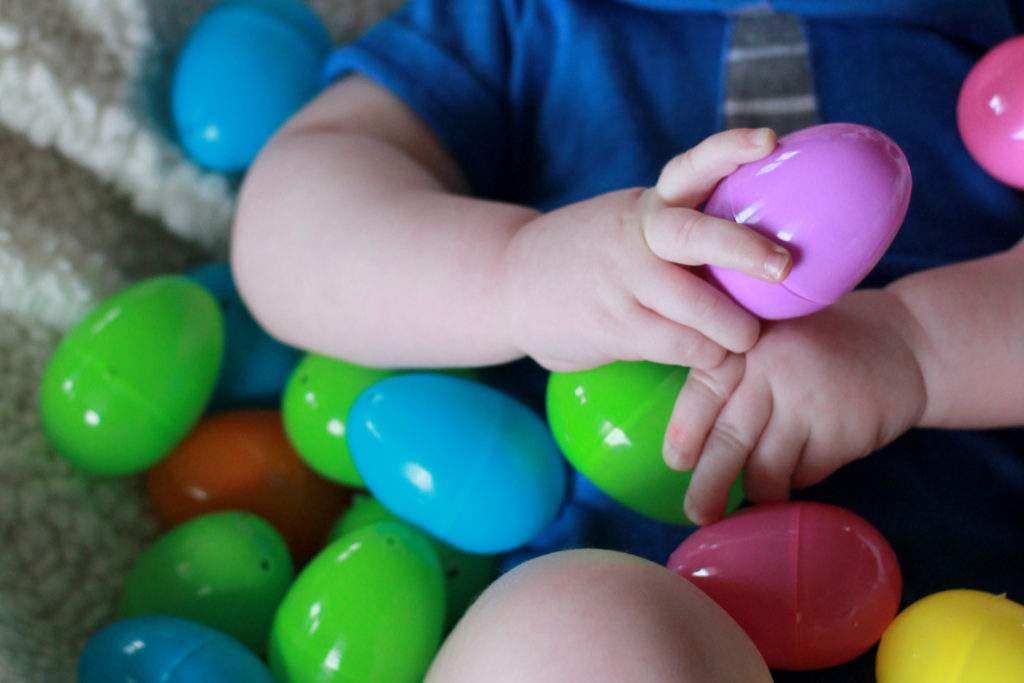
3. Bring on the Easter eggs and props

After baby is situated and happy, pour on the little plastic eggs!

Little bunny ears make for a fun prop as well! You can typically find them at any store around Easter and they are relatively cheap. You could also leave baby’s head uncovered, place a bow on a girl, or opt for a hat. Or if you like to shop Amazon, I’ve conveniently found a couple options for you if you click the highlighted text.
My camera was set to ISO 500; f/2.5; 1/400 sec with a 50mm lens. It was a cloudy day.
Tips for Even Better Photos
- Place your scene near a window with great sunlight. Open up the curtains and the blinds.
- Turn off all florescent lights so the natural window light is the main source of light.
- You want your back to the window, but be careful not to stand in your own light.
- You’re looking for nice all around light, do not put the baby in the direct, bright sun or you will have streaks across their face or body.
- Shoot from above so as not to get other areas of the house into the photo.
Shooting in Manual
Don’t be afraid to try shooting in manual! The main things you’ll adjust in-camera are ISO, aperture, and shutter speed.
Step 1: Turn Up the ISO
ISO is the amount of artificial light your camera adds to the shot. (It stands for International Standards Organization in case you were curious, not “in search of” like you may know it by online, but if it helps you, you can think of it as “In Search Of LIGHT“)
Turn up your ISO to compensate for indoor light. If it’s a nice day out and you have good indoor light, you should be able to set it around 400. If I were outside, I’d set it between 100-400.
The darker it is, the higher your ISO number will need to be. But be careful, the higher the ISO, the grainier the photo will be.
Step 2: Set Your Aperture
How much background blur do you want in your photo? Aperture, also called f-stop, controls the amount of blur around your focal point.
Most cameras show it as a little decimal number with the letter F before it.
A small (low) aperture like f/1.8 means a smaller part of your photo will be in focus.
A larger (high) aperture, like f/5.0, means a bigger part of your photo will be in focus.
The size of the aperture is measured in f-stops. The f is the focal length divided by the diameter of the aperture. So, although aperture and f-stops aren’t technically the same thing, both words refer to the same feature.
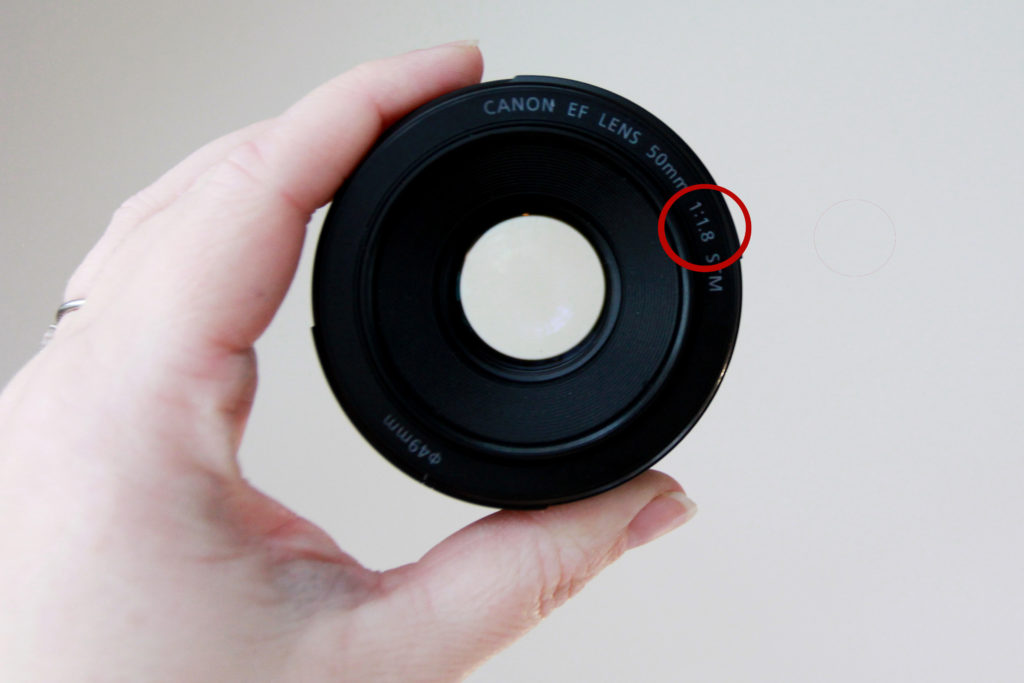
To find the lowest number a lens will go, look at the front of your lens. There’s a little number. It may say 1:1.8. This number means your lens can go as low as f/1.8.
The lower the number, the more light can come in and the more blur, or bokeh, you can gain in your background.
Ok. Now that we’ve had a little lesson, set your aperture to about a 2.8. If it can’t go down to 2.8, just go as low as yours allows.
You can adjust it later if you find you want more or less bokeh. For now, f/2.8 is a good starting point.
Step 3: Set Your Shutter Speed
Now for the shutter speed. This is the last thing that needs adjusted when shooting manually.
Shutter speed is how long the shutter is open after you push the button to take a picture.
The longer the shutter is open, the more light is able to get it.
On the downside, when it’s open longer, there’s more chance for an out of focus photo because it’s hard to hold a camera perfectly still longer than a millisecond.
You want to set your shutter speed to the highest (fastest) number that you can while keeping the light the correct level.
Lower the number to gain more light, but be careful to not go so low that you can’t keep the picture in focus.
For this shot, try starting around 400(which is 1/400sec). You likely don’t want to go below 100.
Step 4: Adjust until you get the desired results
If you can’t get the image bright enough, you will need to either increase your ISO (the artificial light) or lower your aperture to compensate for the shutter speed.
If it’s too bright, lower your ISO or raise your shutter speed.
Extra Tip:
If you are going to go for manual mode and haven’t done it before, I suggest waiting to put baby in the basket until you have your camera set and ready.
Practice on the props until you nail your camera settings.
When All Else Fails, try AV Mode
Having some trouble? Switch to Av (aperture priority) mode.
You will still be mostly in control, but your camera will help you get the correct shutter speed for the best exposure.
Switching to this mode can help guide you. If the shutter speed has to go so slow that you can’t keep it in focus, you definitely should raise your ISO.
Happy Shooting
The Canon 50mm lens is my favorite lens that I own. I use mine everywhere but it’s especially fantastic for indoor photography because it’s a fixed lens.
Fixed lenses allows more light to enter and also tend to have a lower aperture capabilities than zoom lenses. A fixed lens also produces better quality images because they don’t have extra glass inside that moves in order to zoom.
I got mine here. This lens only works with Canon SLR cameras. (SLR is just the term used to mean a camera that can change lenses).
I hope these tips and tricks were helpful! Maybe someday I’ll put together a more extensive, laid out photography guide.
Other posts you might like
- Bible Journaling for Beginners
- 5 Crazy Good Lactation Recipes to Double your Milk Supply
- Nursery Remodel: Mountain Mural

Leave a Reply